prise, l’éjection accidentelle d’at-
taches peut se produire lorsque l’on
démonte la section avant de l’ap-
pareil.
3. Oter les (3) vis à tête cylindrique de
l’avant de l’ap-
pareil et dépos-
er la plaque de
garniture, la
plaque d’e-
spacement et le mécanisme de
déclenchement par contact (WCE)
afin que le clou bloqué soit visible.
4.
Remettre en place tous les éléments
en inversant les étapes décrites en 3.
5. S’assurer que le mouvement de la
gâchette et du
mécanisme de
déclenchement par
contact (WCE) puisse
s’effectuer vers le
haut ou vers le bas sans difficulté.
Support technique
Pour tout renseignement sur le fonc-
tionnement ou la réparation de cette
cloueuse, veuillez appeler notre
numéro d’assistance telephonique sans
frais: 1-866-220-2097.
Attaches et Pièces
de Rechange
N’utiliser que des clous Nº 18 ou un
équivalent. La performance de l’outil,
sa sécurité et sa durabilité pourraient
être réduites si l’on utilise de mauvais-
es attaches. Lors d’une commande de
pièces de rechange ou de clous, préciser
le numéro de pièce.
Réparation de la cloueuse
Seul le personnel dûment qualifié
devrait réparer l'outil en utilisant des
pièces de rechange et des accessoires
qui fonctionnent de manière équiva-
lente.
Méthode d’assemblage pour
les joints d’étanchéité
Les pièces internes doivent être net-
toyées et graissées pendant la répara-
tion d’une cloueuse. Utiliser de la
graisse sur tous les joints toriques.
Chaque joint torique doit être enrobé
de graisse avant l’assemblage.
!
AVERTISSEMENT
5-Fr
Instructions d’utilisation
Operating The Tool
(Continued)
OPERATIONAL MODE
Always know the
operational mode
of the nailer before using. Failure to
know the operational mode could
result in death or serious personal
injury.
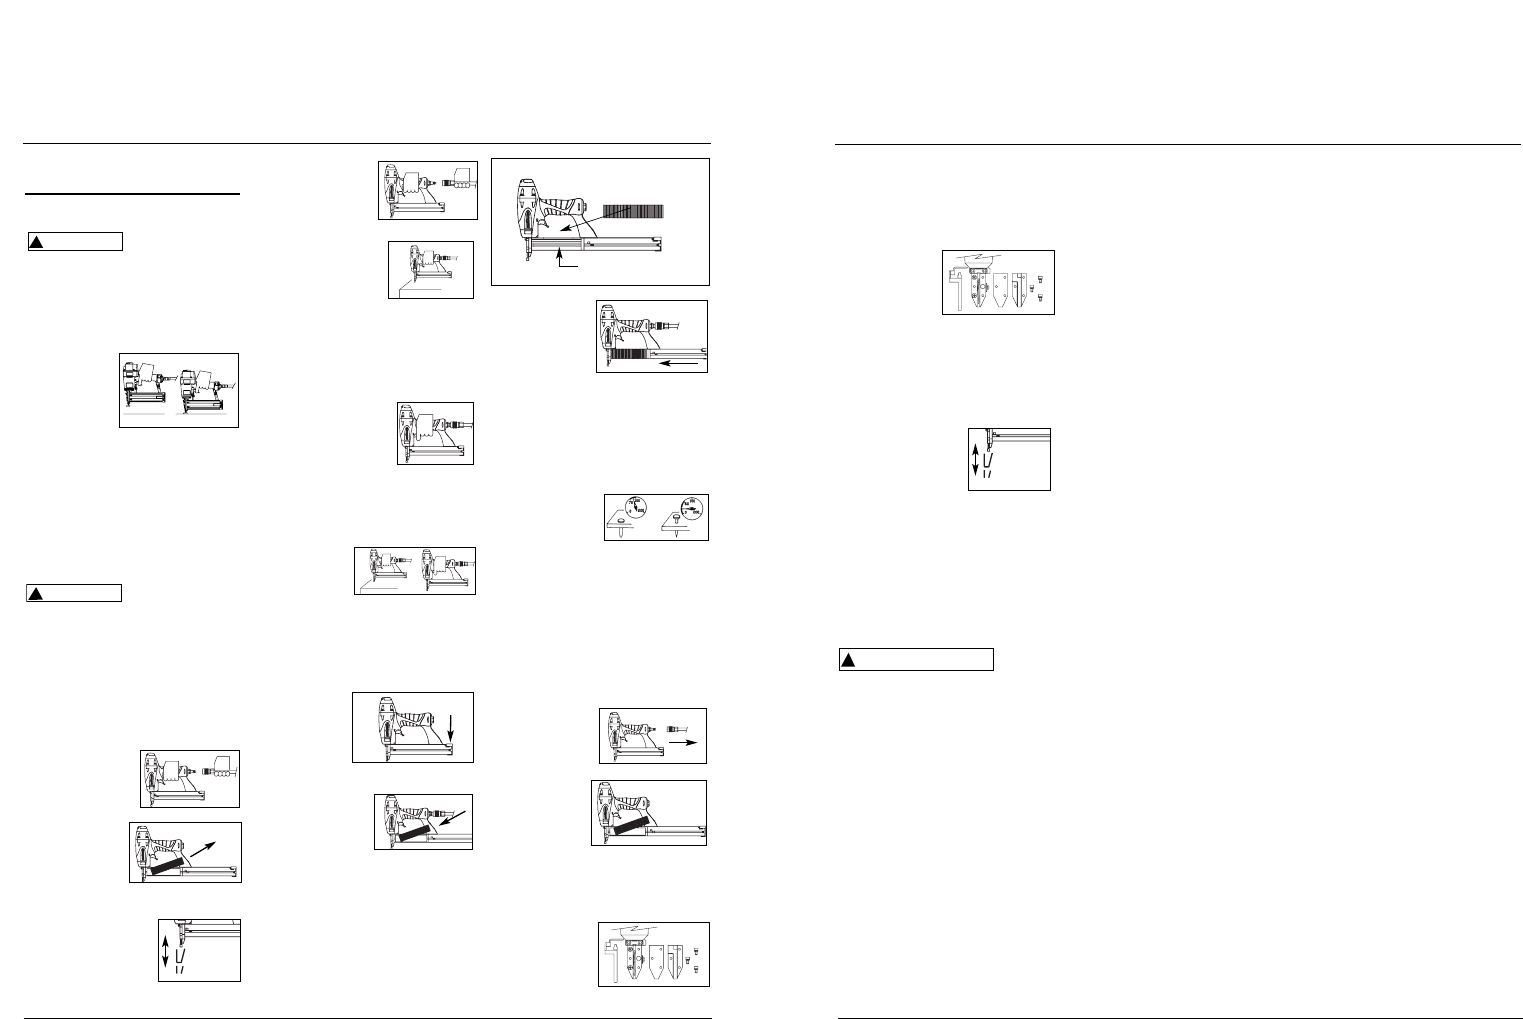
SINGLE SEQUENTIAL MODE
This mode requires the trigger to be
pulled each time
a nail is driven.
The nailer can
be actuated by
depressing the
WCE against the work surface followed
by pulling the trigger.
The trigger must be released to reset
the tool before another nail can be dri-
ven.
CHECKING THE WORK CONTACT
ELEMENT (WCE)
Check the opera-
tion of the Work
Contact Element (WCE) trip mechanism
before each use. The WCE must move
freely without binding through its
entire travel distance. The WCE spring
must return the WCE to its fully
extended position after being
depressed. Do not operate the tool if
the WCE trip mechanism is not operat-
ing properly. Personal injury may
occur.
1. Disconnect the
air supply from
the tool.
2. Remove all fas-
teners from the
magazine. (See
"Loading/
Unloading the
Tool" section.)
3. Make sure the trig-
ger and Work
Contact Element
(WCE) move freely
up and down with-
out sticking or binding.
!
CAUTION
!
WARNING
4. Push the mag-
azine cover
forward until
latch button
pops up.
5. Always unload all fasteners before
removing tool from service.
Unloading is the reverse of loading,
except always disconnect the air
supply before unloading.
ADJUSTING THE FASTENER PENE-
TRATION
1. Regulate the air
pressure to 60
PSI at the tool.
2. Connect the air supply and test for
penetration by driving fasteners
into a sample piece of wood. If the
fasteners do not achieve the desired
penetration, adjust the air pressure
to a higher setting until the desired
penetration is achieved. Do not
exceed 100 psi at the tool or dura-
bility of the tool will be reduced.
CLEARING A JAM FROM THE TOOL
1. Disconnect the
air supply from
the tool.
2. Remove all
fasteners
from the
magazine (see
"Loading/
Unloading The Tool"). Failure to do
so will cause the fasteners to eject
from the front of the tool when the
nose assembly is removed.
3. Remove (3) cap
screws from
the nose of the
tool. Remove
nose plate,
spacer and Work Contact Element
4. Reconnect air sup-
ply to the tool.
5. Depress the Work
Contact Element
(WCE) against the
work surface with-
out pulling the
trigger. The tool MUST NOT
OPERATE. Do not use the tool if it
operates without pulling the trig-
ger. Personal injury may result.
6.
Remove tool from the work surface.
The Work Contact
Element (WCE) must
return to its original
down position. Pull
the trigger. The tool
MUST NOT OPERATE. Do not use
the tool if it operates. Personal injury
may result.
7. Depress the Work Contact Element
(WCE)
against the
work surface.
Pull the trig-
ger. The tool MUST OPERATE.
LOADING/UNLOADING THE TOOL
1. Always connect the tool to the air
supply before loading fasteners.
2. Push down
on the latch
button. Pull
back on the
magazine
cover.
3a. For nails, insert a stick of nails or
equivalent (see
"Fasteners"
section) into the
magazine. Make
sure the pointed ends of the fasten-
ers are resting on the bottom ledge
of the magazine when loading.
Make sure the nails are not dirty or
damaged.
3b. For staples, load a clip of staples
with the crowns straddling the mag-
azine rail.
Operating Instructions
4
movement
Latch
Button
Magazine rail
Mouvement


 (12 pages)
 Manymanuals.com
 Manymanuals.de
 Manymanuals.fr
 Manymanuals.it
 Manymanuals.pl
 Manymanuals.cz
 Manymanuals.es
 Manymanuals-pt.com
Comments to this Manuals