Oilless Compressors
General Safety
Information (Continued)
3. Only persons well acquainted with
these rules of safe operation should
be allowed to use the compressor.
4. Keep visitors away and NEVER allow
children in the work area.
5. Wear safety glasses and use hearing
protection when operating the
pump or unit.
6. Do not stand on or use the pump or
unit as a handhold.
7. Before each use, inspect compressed
air system and electrical components
for signs of damage, deterioration,
weakness or leakage. Repair or
replace defective items before using.
8. Check all fasteners at frequent
intervals for proper tightness.
_WARNINGI
Motors. efectrkal
equipment and controls
can cause electrical arcs
that will 19nite • flammable gas or
vapor. NeVer operate or repair In or
near a flammable gss or vapor. Never
store or spray flammable liquids or
gases In the vtcin/ty of b'le compressor.
Compressor part: may be
hot even ff the unit is
stoppnd.
g. Keep fingers away from a running
compressor, fast moving and hot
parts will cause injury and/or burns.
t0. If the equipment should start to
abnormally vibrate, STOP the
engine/motor and check
immediately for the cause. Vibration
is generally a warning of trouble.
11.To reduce fire hazard, keep
engine/motor exterior free of oil
solvent, or excessive grease.
Ng_r rgm_o_ or
a_npt to a_f._
_ p•int _,d ether a_let_s.
Never ammPt to i_pair
or modify • 1onkl
wvnv.chpower.€om
Welding, drilling or any other.
modiflcltinn will weaken the tank
resulting In damage from nlpture or
expinsinn. Always _plece worn or
dam:gad tenk_
I NOTICE I _.inl_.ld_..
tank dally.
12. Tanks rust from moisture build-up,
which weakens the tank. Make sure
to drain tank regularly and inspect
periodically for unsafe conditions
such as rust formation and corrosion.
t3. Fast moving air will stir up dust and
debris which may be harmful. Release
air slowly when draining moisture or
depressudzil_cJ the compressor system.
SPRAYING PRECAUTIONS
IAWARNINGI
Do not spray flammable
meterfait in vicinity of
open flame or near
ignition sources including the
€ompre_or unlL
14. Do not smoke when spraying paint,
insecticides, or other flammable
substances.
15. Use a face mask/
resplretor when
spraying and spray in
a well ventilated area
to prevent health and
fire hazards.
16. Do not direct paint or other sprayed
material at the compressor. Locate
compressor as far away from the
spraying area as possible to
minimize overspray accumulation
on the compressor.
17.When spraying or cleaning with
solvents or toxic chemicals, follow
the instructions provided by the
chemical manufacturer.
Assembly
HANDLE/_SI:MBLY
Compressor handle has a notch (or
detent) at top of handle. This notch
provides a handy place to hang a spray
gun, sandblast gun. or other tool
equipped with a hook.
t. If a handle grip was incioded with
the unit, coat the inside of grip with
a thin film of soapy water. Push grip
onto handle.
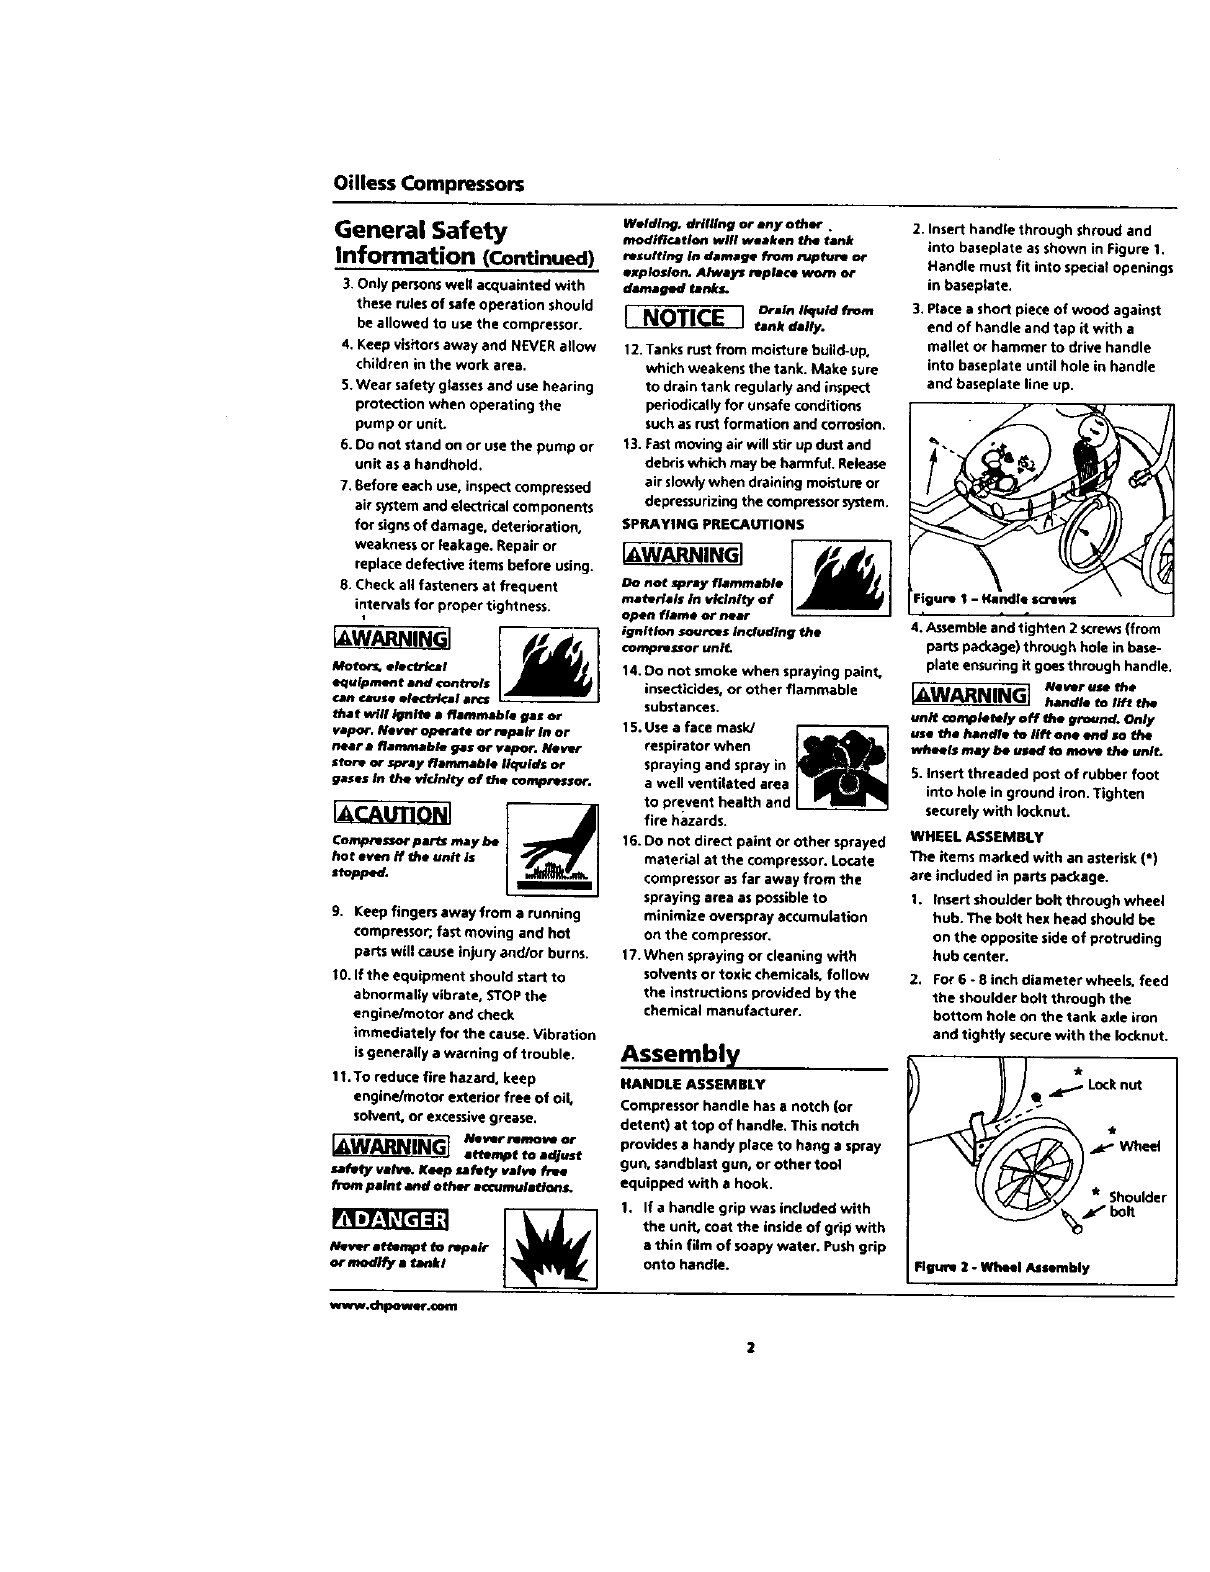
2. Insert handle through shroud and
into baseplate as shown in Figure 1,
Handle must fit into special openings
in baseplate.
3. Place a short piece of wood against
end of handle and tap it with a
mallet or hammer to drive handle
into haseplate until hole in handle
and baseplate line Up.
4. Assemble and tighten 2 screws (from
parts package) through hole in base-
plate ensudng h goeslhrough handle.
Ne vIFr USe t_le
handle to lift the
unit completely off the ground. Only
use the hand/e to lift one end so the
wheets may be usecl to movt the unlt
5. Insert threaded post of rubber foot
into hole in ground iron. Tighten
securely with Iocknut.
WHEEL ASSEMBLY
The items marked with an asterisk (*)
are included in parts package.
1. Insert shoulder bolt through wheel
hub. The bolt hex head should be
on the opposite side of protruding
hub <:enter.
2. For 6 - 8 inch diameter wheels, feed
the shoulder bolt through the
bottom hole on the tank axle iron
and tightly secure with the iocknut.
)Q _ Lock nut
a u,der
Figure 2 -wheel Assembly


 (24 pages)
 (16 pages)
 Manymanuals.com
 Manymanuals.de
 Manymanuals.fr
 Manymanuals.it
 Manymanuals.pl
 Manymanuals.cz
 Manymanuals.es
 Manymanuals-pt.com
Comments to this Manuals